This post is specifically on the risks of the Hep B vaccine.
ABC 20/20 Part 1 The Hep B Controversy
ABC 20/20 Part 2 Hep B Controversy
The religious exemption that the talk about in these videos is an option and from my research publics schools must accept it without question-legally. Private schools do not need to accept the exemption.
Info on Vaccine Exemptions By State
NJ Vaccine Laws
Saturday, March 24, 2012
Friday, March 9, 2012
Lemon Blueberry Muffins
Blueberry Lemon Muffins
Ingredients:
2 cups unbleached all-purpose flour
1 1/2 tsp baking soda
1/2 tsp salt
zest of 2 lemons
3/4 to 1 cup granulated sugar
1 cup nondairy milk
1/3 cup canola oil
1 tsp lemon extract
1 tbsp white distilled vinegar
1 1/2 cups fresh blueberries, picked over to remove stems
Preheat oven to 400 degrees. Lightly grease your muffin tins.
In a medium bowl, combine the flour, baking soda, salt, and lemon zest.
In a large bowl, combine the sugar, milk, oil, lemon extract, and vinegar. Mix well. Add the flour mixture, stirring until the ingredients are just blended. Gently fold in the berries using a rubber spatula.
Fill greased or nonstick muffin tins about two-thirds full. Bake until the muffins are lightly browned and a wooden skewer inserted into the center comes out clean, about 20 minutes. While the muffins are baking, lick the bowl clean. No eggs means no salmonella!
Remove from the oven and let sit for 5 minutes. Remove the muffins from the tins and cool on a wire rack.
Yield: 12 muffins
Sunday, January 22, 2012
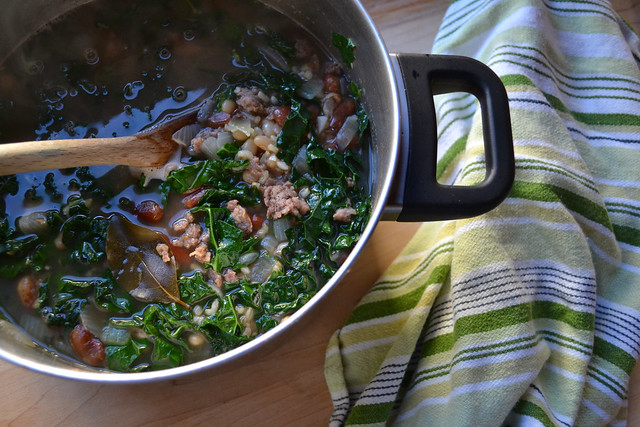
Bean, Kale, Rice & Sausage Soup
~~~~~~~~~~~~~~~~~~~~~~~~~~~~~~~~~
-
- 1/2 cup dry white navy beans, soaked overnight and rinsed
- 1/2 cup Jacob's Cattle Beans (Kidney beans would be fine), soaked overnight and rinsed
- 1/2 cup brown rice, soaked overnight and rinsed
- 1/2 pound venison sausage (Any sausage of your choosing is fine, and you could easily use 1/4 pound.)
- 6-8 cups vegetable or chicken broth/stock
- 2 bay leaves
- 1 large onion, chopped
- 4 cloves garlic, chopped fine
- 1/2 bunch of kale, chopped (we like it chopped fairly small)
Directions:
This soup has a simple list of ingredients, but the flavor is rich and complex.
1. In a large stock pot, add the soaked beans, bay leaves and stock. Bring to a boil, turn heat down to medium high and cook for 45 minutes. Skim any foam off the top as the cook. Add the brown rice and continue to cook until the beans are tender. Add a little more water if necessary. Don't worry if the rice is not 100% cooked at this point.
2. Once the beans are cooked, carefully pour the beans, rice and liquid to a large bowl.
3. In the soup pot, saute the sausage until about 1/2 way cooked (using your spatula or a wooden spoon to break up the sausage really fine), add the onion and continue to saute until sausage is fully cooked and onion becomes tender. Add the garlic and saute for one more minute. Drain off fat, if there is any, and if that is your preference.
4. Carefully add the beans and rice back to the soup pot. Bring just to the boiling point then turn down to low and simmer, covered, for about 15 minutes.
5. Add the chopped kale and stir. Cover the pot again and simmer for another 5 minutes or so. Serve.
I don't serve this with cheese but some Italian cheese would be lovely on top.
As with most soups, a bit of resting time (with the heat off) helps to marry the flavors even further. I hope you enjoy this soup, it is a new favorite in our home. You could substitute a few slices of bacon for the sausage. Also, this could easily be made vegetarian but would lack the smokiness the sausage brings.
Mushroom Barley Patties
Greek Inspired Mushroom Barley Patties

There is a little restaurant that Joel and I love to go to at the coast. It has some whole grain options and a lot of gourmet choices. Last time we were there, Joel got a barley burger that he liked a lot. Of course, I had to go home and learn how to make it myself! He thinks that mine is even better. 
We found that we liked it with pita bread instead of a hamburger bun. It was a little bready with the bun. Besides, this patty has definite Greek leanings which makes it a natural fit with pita bread. The other advantage is if the patty starts to fall apart (like it did at the restaurant and at home), the pita will catch all the loose pieces.
These patties are flavored with parsley and mint, a classic Greek combination. The mint makes it very flavorful, but is optional. You do need a food processor for this recipe.
Greek Mushroom Barley Patties -makes eight medium sized patties, serves 4
Ingredients:
1 pound of mushrooms, cleaned with a mushroom scrubber or wet cloth, stems trimmed
1 1/2 cups of cooked barley (I use hulled barley instead of pearled barley. It takes longer to cook, but is a whole grain with more nutritional advantages. I soak it in water overnight, rinse, then put in a pot with enough water to cover well. I simmer for 40-60 minutes until tender. I like to get this step done earlier in the day).
Several tablespoons of butter or oil
A large handful of washed parsley with the stems cut off (about one cup)
A small handful of washed mint, stems cut off (about 1/4 cup)
1 egg
2 Tablespoons of champagne vinegar
1 teaspoon of salt
1/2 teaspoon pepper
Directions:
Preheat oven to 425 degrees
Preheat oven to 425 degrees
Process mushrooms in a food processor by pulsing until coarsely chopped.
Heat oil/butter in a large skillet over medium-high heat until hot. Add your mushrooms. Stir continuously until mushrooms are just starting to brown any released water from the mushrooms is evaporated.
Now add your cooked mushrooms and barley, parsley, mint, salt, vinegar, and pepper into the food processor. Pulse until well blended. With processor running, add egg (this is to prevent the egg from cooking if the mushrooms are still hot). Your mixture should now resemble something like ground beef.
Heat oil/butter in a large skillet over medium-high heat until hot. Add your mushrooms. Stir continuously until mushrooms are just starting to brown any released water from the mushrooms is evaporated.

Now add your cooked mushrooms and barley, parsley, mint, salt, vinegar, and pepper into the food processor. Pulse until well blended. With processor running, add egg (this is to prevent the egg from cooking if the mushrooms are still hot). Your mixture should now resemble something like ground beef.
Form into eight patties and put on a pan lined with parchment paper.

Cook for around 15 minutes, checking them at ten minutes and every five minutes after. Patties should be firm, but still moist when done.
Serve with warmed pita bread, avocados, cucumber yogurt sauce, tomatoes, and lettuce or sprouts. Enjoy!

Broth of the Week: Pasture Raised Chicken Bone Broth
This is from the Blog Recipes To Nourish-one of my favorites recently:) Enjoy!
Pastured Chicken Bone Broth

What is bone broth? It is a nourishing, homemade broth that cooks for 24 hours. Yes, 24 hours. The long cooking time helps break down the bones and release all of the essential nutrients, leaving you with a beautiful broth.
Bone broth is probably one of the most nourishing and healing foods you can consume. Traditionally in Asian cultures, a fish bone broth is the first thing served to women after giving birth. It is so nourishing that post-partum women consume it before any other food. It helps her heal faster and nourish her body.
Why is it good for you? Bone broth is better than a vitamin supplement because the vitamins and minerals are readily available for your body to use. It’s known for having healing properties, replenishing and nourishing the body when sick, healing the gut, helping with joint pain and arthritis, strengthening your bones, and even helps withcellulite.
For more information on Bone Broth, check out Sally Fallon’s article, “Broth Is Beautiful.”
Pastured Chicken Bone Broth
The “how-to-cure-everything” nourishing broth.
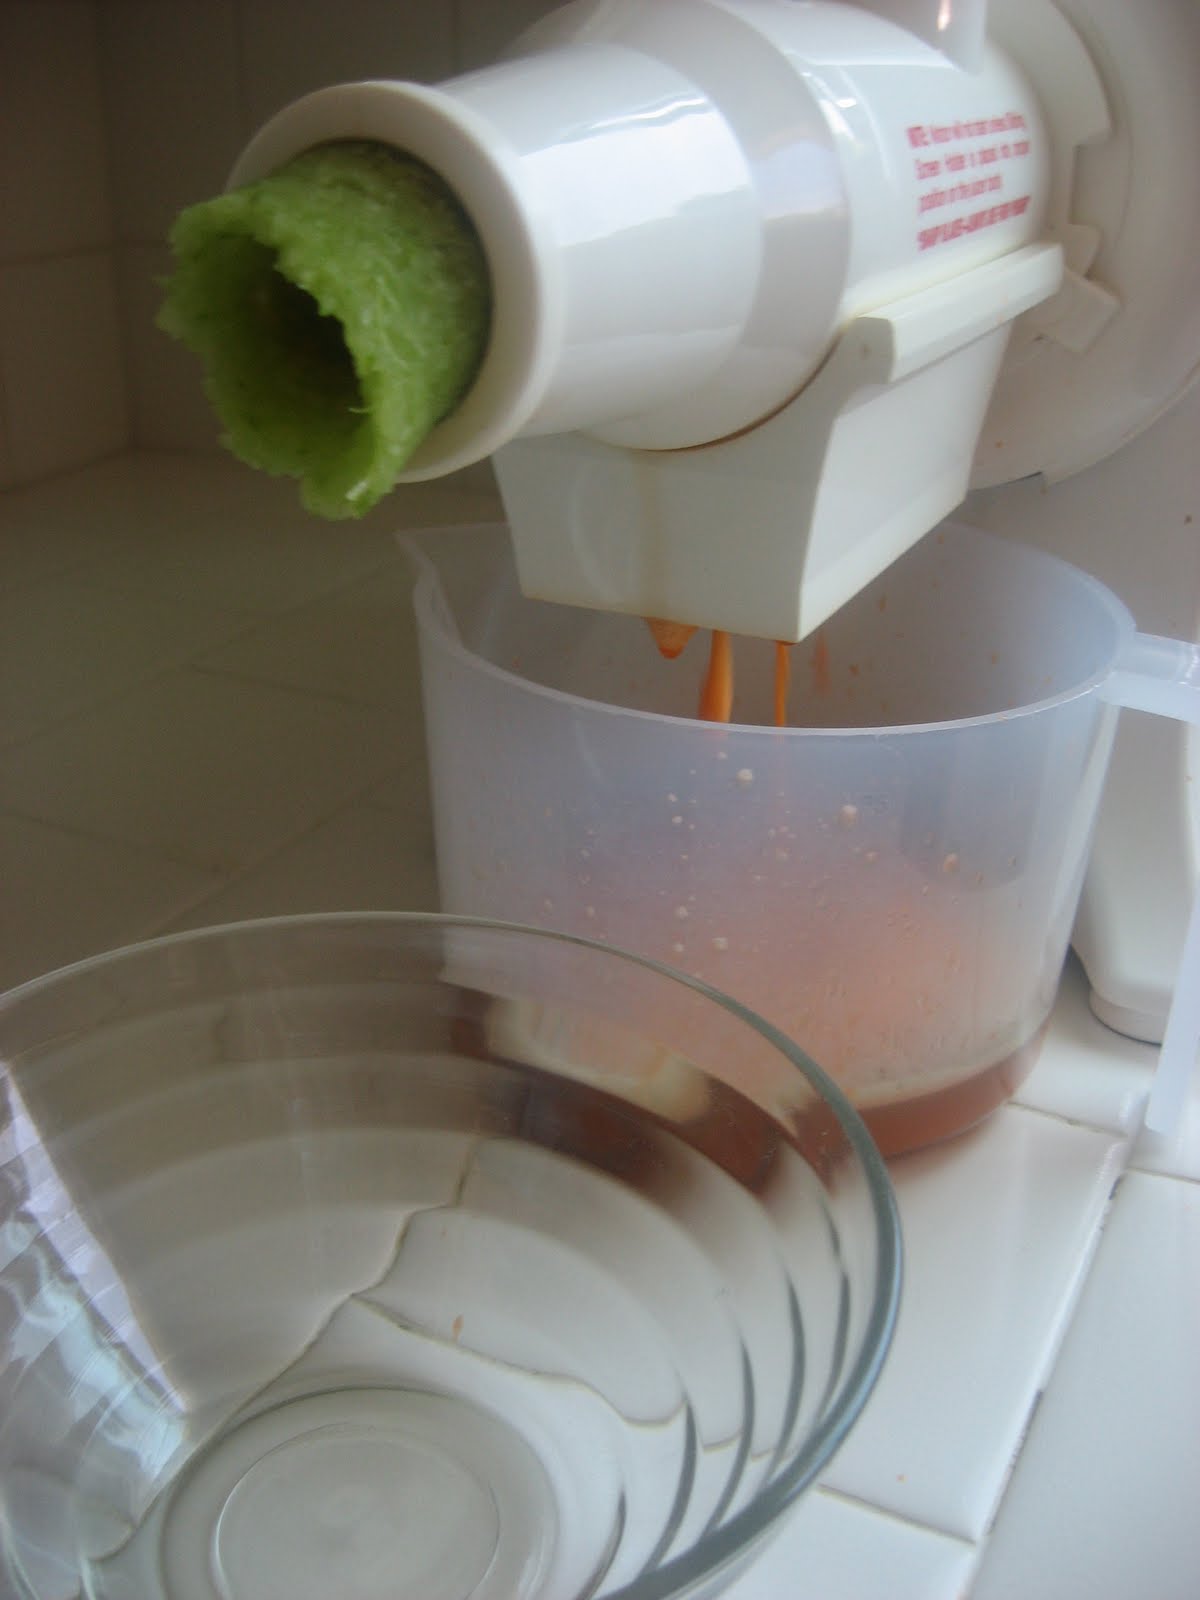
Equipment: 6-quart (or larger) Enamel or Stainless Steel Stock Pot, Juicer (optional), Large Straining Colander, Large Bowl or Large Measuring Cup
- Bones of 1-2 pastured chicken carcasses (leftover bones from roasting a whole chicken work great)
- Neck, feet, and/or head of pastured chicken (optional – I know, sounds gross, but there are a lot of nutrients in the feet and head)*
- ¼ cup organic unfiltered apple cider vinegar
- Juice of ½ lemon (if you have Meyer lemons, use them, they have a great flavor)
- 7-10 fresh organic Shiitake mushrooms (optional – these have medicinal properties and are immunity-enhancing)
- 10 sprigs fresh thyme or 2 tablespoons dried thyme
- 1 sprig fresh rosemary
- 1 sprig fresh marjoram (optional)
- 3-4 cloves fresh garlic or 2 green garlic – if in season, cut in half
- 2 strips kombu (See Resources – Sea Vegetables)
- 1 strip wakame (See Resources – Sea Vegetables)
- 4 strips Astragalus root (optional – nourishes the immune system)
- 4 carrots, scrubbed, not peeled
- 4 celery stalks w/ leaves
- Filtered water, enough to cover everything in pot
*** Do NOT salt until the end of cooking time.***
1. Add bones/carcass, neck/feet/head if you have them, water, vinegar, lemon juice, mushrooms, herbs, garlic, sea vegetables, and Astragalus root.

2 Small Pastured Chicken Carcasses

2. Let soak at room temperature for 45 minutes to 1 hour. This step (the vinegar and lemon) helps draw out nutrients from the bones.
3. Option 1: If you have a juicer, juice all carrots and celery. Take the juice and leftover pulp and add this to the pot. Option 2: If you don’t have a juicer, break the carrots and celery in half and add to the pot.


4. Cover, bring to a boil, and reduce heat to simmer on low heat for 24 hours. Make sure it remains simmering through the whole cooking process.
5. At 12 hours, you can take a potato masher and mash everything in the pot. The bones should start to be soft at this point and start to break down, allowing you to release some of the marrow.
6. At 24 hours, remove from heat, strain through large colander into large bowl or large measuring cup (I use one 12 cup measuring cup and one 4 cup measuring cup.)

7. Cool in refrigerator or cold ice bath – store in refrigerator.
8. Once cooled, you can store portions in BPA-free ice cube trays, or freezer bags. Freeze whatever you won’t use within 3 days.
*Making the bone broth with the head or feet will make a more gelatinous broth, which is very healing and loaded with nutrients.
Yield: Varies, makes about 12-14 cups.
Other Additions: Sometimes I love to add 2 tablespoons chili powder and 1 tablespoon cumin to the broth. These spices add a delicious flavor. I also like to add fresh dill from time to time when I have some on hand.
Storage: Store portions in BPA-free ice cube trays (which will equal about 2 tablespoons per cube) or in 1-2 cup portions in freezer bags. This will come in handy when you’re cooking and you just need a couple of tablespoons of liquid or 1 cup of liquid, etc.
Notes: Drink at least 1 cup daily. Remember to season with unrefined Celtic sea salt since there is no salt in the broth.
Use: In soups for your stock, chicken or meat dishes, veggie dishes, etc.
Tips: If you’re not comfortable cooking this for 24 hours, cook for 12 hours, it will not be a true “bone broth” but will still be nourishing and delicious. Also, when you roast a chicken, save the carcass/bones and freeze in freezer bag. This way you will have bones available to you when you need to make bone broth.
Happy Cooking!
Thursday, January 19, 2012
Sushi -Fun to make with toddlers!
Disclaimer: I have never read how to make sushi or have taken a class!
This is how we make it at home and it tastes great!
Recipe to make your own sushi:
Cooked and cooled rice-works great with left overs:)
Organic Sushi Nori-We use Emerald Cove Brand

Fillings-
Sliced avacado
Sliced cucumber
Shredded carrots
Cream cheese
Sliced or Shredded Veggie of Choice
You can also use sushi-grade tuna and salmon for mommies rolls
Toppings-
I make up a batch of spicy mayo for my rolls
Mayo/Veganiase
Shiracha or chili sauce
*mix the chili sauce into mayo to taste!
Naturally fermented sauce sauce
Pickled ginger (we don't use this)
All you need to make sushi is one of those wooden sushi rollers and a small bowl of water with a food brush.
1. Place Nori on Sushi roller
2. "Paint" water all of the Nori to soften it up *Toddler part!
3. Place Rice in the center of the Nori *Toddler Part!
4. Top Rice with veggies of choice (and fish for mommy rolls) and cream cheese/spicy mayo *Toddler Part!
5. Fold over one side of the Nori with the sushi roller and press tightly in to make a roll shape with that end. Continue rolling to the end of the Nori.
6. Slice the Sushi roll in 5-6 pieces
7. Dip in soy sauce or spicy mayo
Enjoy!!
This is how we make it at home and it tastes great!
Recipe to make your own sushi:
Cooked and cooled rice-works great with left overs:)
Organic Sushi Nori-We use Emerald Cove Brand
Fillings-
Sliced avacado
Sliced cucumber
Shredded carrots
Cream cheese
Sliced or Shredded Veggie of Choice
You can also use sushi-grade tuna and salmon for mommies rolls
Toppings-
I make up a batch of spicy mayo for my rolls
Mayo/Veganiase
Shiracha or chili sauce
*mix the chili sauce into mayo to taste!
Naturally fermented sauce sauce
Pickled ginger (we don't use this)
All you need to make sushi is one of those wooden sushi rollers and a small bowl of water with a food brush.
1. Place Nori on Sushi roller
2. "Paint" water all of the Nori to soften it up *Toddler part!
3. Place Rice in the center of the Nori *Toddler Part!
4. Top Rice with veggies of choice (and fish for mommy rolls) and cream cheese/spicy mayo *Toddler Part!
5. Fold over one side of the Nori with the sushi roller and press tightly in to make a roll shape with that end. Continue rolling to the end of the Nori.
6. Slice the Sushi roll in 5-6 pieces
7. Dip in soy sauce or spicy mayo
Enjoy!!
Subscribe to:
Posts (Atom)